Updated June 2026. Based on the failure patterns behind our eight room-by-room LVP comparisons plus reader-submitted install problems (~90 photos reviewed since 2023). Every "mistake" below maps to a specific failure mode — buckling, gapping, broken joints, soft spots — that we've traced back to the same install-day decision multiple times. Cross-referenced against install instructions and warranty terms from Lifeproof, NuCore, Smartcore, COREtec and Shaw.
Why LVP problems are almost never the plank's fault
Vinyl plank is marketed as the forgiving floor — waterproof, click-together, "installs in a weekend." And the marketing is mostly honest: the planks themselves almost never fail. What fails is the system — a floating floor is a single connected raft that expands, contracts and flexes as one object, and every classic LVP problem (buckling ridges, gaps opening between planks, joints that click underfoot, soft spongy spots) traces back to an install-day decision that ignored the raft physics.
That's actually good news. It means the difference between an LVP floor that looks new at year 15 and one that buckles in its second summer isn't the $2/sq ft you didn't spend on a premium brand — it's a handful of rules that cost almost nothing to follow and a tool kit that runs about $60 total. Flooring installers fix the same seven mistakes over and over; this guide is that repair-call list, written down before you start.
This guide pairs with our 11 Best LVP Brands 2026 roundup — that page covers which plank to buy from budget to premium, this page covers how to not waste it. Read them together before the boxes arrive.
Mistake #1: Skipping acclimation
What goes wrong: Gaps open between planks in winter, or the floor peaks slightly along joints in summer — starting within the first few months, evenly distributed across the room rather than at one spot. The floor was simply the wrong size on install day.
Why it happens: Planks that rode in a 110°F delivery truck or sat in a 35°F garage are physically a different size than they will be at room temperature. Click a floor together while the material is heat-swollen and it contracts into gaps as it cools; click it together cold and it expands into pressure as it warms. Rigid-core SPC moves less than flexible LVP, and some brands advertise "no acclimation needed" — but nearly all of them still require 48 hours at room temperature in the warranty fine print, and skipping it is the first thing a claims adjuster asks about.
The fix: bring the boxes into the install room 48 hours early, stack them flat (never on edge — planks bow), open the carton ends so air circulates, and keep the room within the brand's service range (typically 55-85°F). Run the HVAC at normal living temperature — acclimating in an unheated addition in January accomplishes nothing. Use the same 48 hours for subfloor prep and the wait costs you zero schedule time.
Mistake #2: No expansion gap at the perimeter
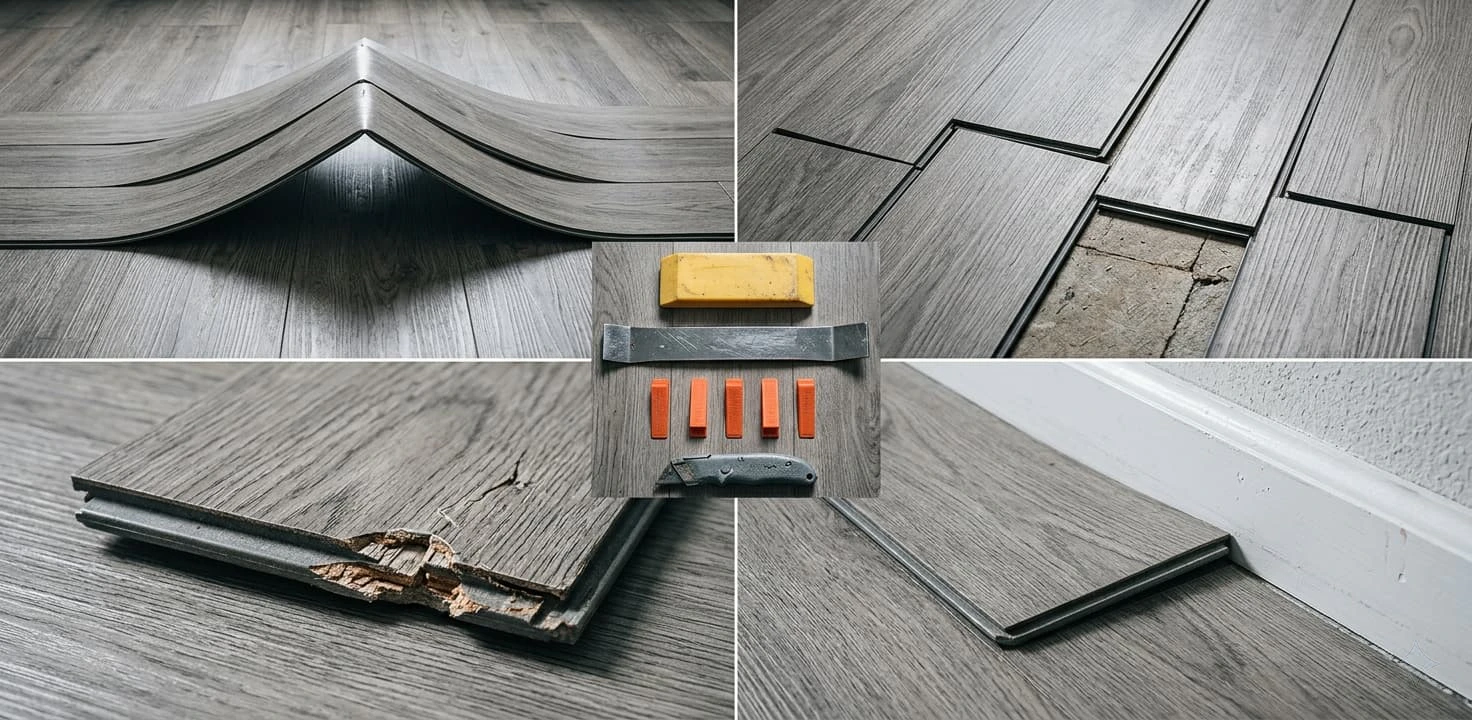
What goes wrong: The signature LVP failure — a buckled ridge or "tent" peaking up somewhere in the middle of the room, usually appearing during the first hot week of summer. The floor looks like a wave froze mid-roll.
Why it happens: A floating floor must be able to move. A 20 ft run of vinyl plank expands roughly 1/4 inch across a normal seasonal temperature swing; manufacturers require a 1/4-3/8 inch gap between the flooring and every fixed object — walls, door jambs, pipes, stair nosings, tile transitions. DIYers cut the last row tight to the wall because it looks neater and "the baseboard covers it anyway." Then July arrives, the raft expands, hits the wall on all four sides, and the pressure has exactly one direction left to go — up.
The fix: spacer wedges against every wall during install ($8-12 for a bag that includes a tapping block), and a gap check at every fixed object before you move to the next row. Around pipes, drill the hole 3/4 inch oversize and cover with a pipe collar. At doorways, undercut the jamb and casing with an oscillating saw so the plank slides underneath with room to move — never scribe-cut tight around the trim. The gap disappears under baseboard or quarter-round at the end; nobody ever sees it, but the floor needs every millimeter. Browse install kits with spacers on Amazon →
Already buckled? You usually don't need new flooring. Pull the baseboard at the nearest wall, trim 3/8 inch off the perimeter row with an oscillating saw, press the ridge flat, and let the floor relax for a week before re-installing the trim. If a ridge stays peaked, a few click-lock joints under it have likely creased and those rows need re-laying.
Mistake #3: Installing over an unflat subfloor
What goes wrong: Joints that click or pop underfoot, planks that rock as you walk, gaps that open at high spots, and — months later — broken click-lock tongues that leave a row permanently loose. The floor felt fine on day one and degraded with traffic.
Why it happens: The flatness spec for almost every LVP brand is 3/16 inch per 10 ft, and almost no real-world subfloor meets it untouched. Every dip becomes a void under the raft; every step over a void flexes the click-lock joint like a credit card being bent. A joint that flexes a thousand times snaps. Rigid SPC core makes this worse, not better — stiff planks bridge dips instead of conforming, concentrating all the flex right at the seams.
The fix: check before you click. Sweep the bare subfloor, drag a 6-10 ft straightedge across it in a star pattern, and mark every spot where you can slide a 1/4-inch spacer underneath.
- Low spots on concrete or plywood: cement-based self-leveling compound — about $35-40 per bag, one bag covers ~50 sq ft at 1/8 inch. Prime first, pour, done in an afternoon, walkable in 4-6 hours. Browse self-leveling compound on Amazon →
- High spots on concrete: grind down with an angle grinder and diamond cup wheel (rental ~$40/day).
- High ridges on plywood seams: belt-sand or plane flush, and screw down any squeaky or springy panels while you're there.
Half a day of leveling is the least glamorous step of the whole project and the single biggest predictor of whether the click joints survive a decade.
Mistake #4: Pinning the floating floor
What goes wrong: Buckling or joint separation that always starts near the same object — the kitchen island, a doorway transition strip, a built-in bookcase. The rest of the floor looks fine; the failure radiates from one anchor point.
Why it happens: "Floating" means the entire floor must stay free to slide. Anything fastened through the planks into the subfloor — island cabinets, transition strips screwed down through the vinyl, closet door tracks, even a toilet flange bolted over the plank in a bathroom — nails the raft to the ground at that point. Seasonal expansion then pushes against the pin, and the pressure relieves at the nearest weak line. A pinned floating floor isn't floating; it's a stressed membrane waiting for summer.
The fix: sequence and clearance.
- Kitchens: install cabinets and islands first, directly on the subfloor, then float the LVP around them with the expansion gap hidden under the toe-kick. Never set a screwed-down island on top of floating planks.
- Transitions and trim: fasten T-molding tracks and baseboards to the subfloor or wall — never through the plank. The flooring slides freely underneath. Browse floating-floor transition strips on Amazon →
- Bathrooms: set the toilet flange to finished-floor height and cut the plank around it with clearance — don't bolt the toilet down through the plank field.
- One immovable heavy object (gun safe, aquarium, pool table) — accept that it pins the floor, and plan the expansion break at that object, or use glue-down LVP in that room where pinning is irrelevant.
Mistake #5: Doubling up underlayment (or skipping the vapor barrier)
What goes wrong: Two opposite failures from the same layer. Too much cushion: a spongy, soft-feeling floor whose click joints break within a year. No moisture layer on concrete: a floor that's fine for a year, then develops musty smell, cupped planks, or mold spots on the underside when a plank comes up.
Why it happens: Most mid-range and premium LVP now ships with a pad already attached to the plank. Adding a separate foam underlayment under pre-padded planks feels like bonus comfort but doubles the squish — the joints sink and lever against each other with every step, far past their rated deflection. Meanwhile concrete slabs (basements, slab-on-grade ranches, garages converted to rooms) constantly release water vapor, and "waterproof" planks don't protect the cavity under the floor — vapor condenses there and feeds mold on the slab side.
The fix: one decision per substrate, straight from the spec sheet.
- Pre-attached pad + wood subfloor: install directly. Nothing underneath.
- Pre-attached pad + concrete: 6-mil polyethylene vapor barrier only, seams overlapped 8 inches and taped — about $25 for a typical room. No foam. Browse 6-mil vapor barriers on Amazon →
- No attached pad + wood: one thin LVP-rated underlayment (1-1.5mm) — check the flooring brand's approved list; thick laminate foam is not it.
- No attached pad + concrete: a combination underlayment with built-in vapor film, or poly sheet plus thin pad.
The rule that prevents both failures: never two cushion layers, never zero moisture layers on concrete.
Mistake #6: Bad first row and weak seam stagger
What goes wrong: Rows drift out of parallel until the final row is a long skinny wedge; end joints line up into "H-patterns" that read as stripes across the room; and the aligned seams become the floor's structural weak line, opening first when anything else (acclimation, temperature) goes slightly wrong.
Why it happens: Walls are never straight. Snapping the first row tight against a bowed wall bakes the bow into every subsequent row — the error compounds across the room instead of averaging out. And stagger isn't aesthetic: end joints are the weakest point in a click-lock floor, and clustering them (offsets under 6 inches, or repeating "stair-step" patterns from always starting rows with the same cutoff lengths) concentrates weakness into lines.
The fix: three habits in the first thirty minutes of the install.
- Snap a reference line a plank-width-plus-gap off the straightest wall (chalk line, $10) and set the first row to the line, not the wall. Scribe the wall side of the first row if the wall bows more than 1/4 inch.
- Dry-measure the room width before starting — if the final row would land under 2 inches wide, rip the first row narrower so both edge rows end up balanced. A sliver row at the far wall has almost no locking strength.
- Randomize the stagger — keep end joints at least 6-8 inches apart row-to-row, start each new row with the cutoff from the previous one when it qualifies, and step back every few rows to check no patterns are forming.
None of this needs skill — it needs a chalk line and the discipline to not "just start in the corner." Browse chalk line reels on Amazon →
Mistake #7: Ignoring sun and temperature extremes
What goes wrong: A perfect install that fails anyway — buckling in a sunroom's first summer, fade stripes where window light crosses the floor, gaps in a vacation cabin that sat unheated through January. The room, not the install, was the problem.
Why it happens: Every LVP product has a rated service temperature range — typically 55-85°F — and an expansion budget sized for normal indoor swings. Three room types routinely leave that envelope. Sunrooms and floor-to-ceiling south glazing: direct sun heats dark planks to 110-140°F, driving expansion far past what a 3/8-inch gap absorbs, while UV fades the printed wear layer in window-shaped stripes. Seasonally unheated spaces (cabins, three-season porches, garages-turned-gyms without HVAC): the floor cycles outside its range twice a year, and warranty coverage typically requires "climate-controlled" conditions year-round. Radiant-heat floors set above the brand's limit (usually 85°F surface) slowly cook the locking profile.
The fix: match the product and the layout to the room before falling in love with a color.
- Sun-heavy rooms: pick light colors (lower surface temp, slower visible fade), confirm the brand's wear layer is UV-stabilized, and read the warranty for an explicit sunroom exclusion — several major brands have one. UV-filtering window film is a $40 assist that protects the furniture too. Browse UV-blocking window film on Amazon →
- Unconditioned spaces: double the expansion gap to 1/2 inch, expect some seasonal gapping as cosmetic reality, or choose a product rated for the swing — a few SPC lines are warranted down to freezing.
- Radiant heat: cap the system at the flooring brand's surface limit and bring temperature changes on gradually (5°F per day) at season transitions.
- True four-season sunrooms: honestly, porcelain tile in that one room and LVP everywhere else beats fighting physics.
Watch: the mistakes in action
Reading about expansion gaps and seam stagger is one thing — watching planks get clicked together the wrong way makes the rules stick. Arko Floors' walkthrough covers the most common beginner errors on a real install, with the camera right at floor level where the joints either lock or don't. Five minutes here saves the classic first-room fumbles.
"5 Common Beginner Mistakes Installing Vinyl Plank Flooring" by Arko Floors — embedded from YouTube
The $60 tool kit that prevents all seven
Unlike garage coatings, LVP prevention isn't about buying better chemistry — it's a short tool list and the rules above. The full kit, all linked for one-click ordering:
- Install kit — tapping block, pull bar, spacer wedges ($15-25). Covers mistakes #2 and #6, and the pull bar is the only way to close joints in the last row against a wall. Browse LVP install kits on Amazon →
- Chalk line reel ($8-12) — the straight first row that the whole floor inherits.
- 6-10 ft straightedge or box level ($25-40) — finds the subfloor dips before the floor does.
- Oscillating multi-tool ($40-80 if you don't own one) — undercuts door jambs and trims perimeter rows on a buckled-floor rescue. The one "real tool" on the list and the one you'll reuse forever. Browse oscillating multi-tools on Amazon →
- Per-substrate consumables: 6-mil vapor barrier on concrete ($25), self-leveling compound where the straightedge says so ($35-40/bag).
Haven't picked the plank yet? Our 11 Best LVP Brands 2026 roundup → ranks budget big-box picks against designer-tier lines by wear layer, climate stability and price per sq ft. Pair the brand pick with this mistakes guide and the install is the easy part.
 11 Best LVP Brands 2026
 Kitchen Floor: Vinyl Plank vs Hardwood
 Bathroom Floor: LVP vs Ceramic Tile
 Laundry Room Floor: LVP vs Epoxy