Updated June 2026. Based on the failure patterns behind our 11-brand deck stain testing plus reader-submitted staining problems (~70 photos reviewed since 2023). Every "mistake" below maps to a specific failure mode — peeling, blotching, tacky never-drying patches, one-season wear-through — that traces back to the same prep- or application-day decision. Cross-referenced against application instructions from Cabot, Penofin, Ready Seal, Defy and Behr.
Why decks fail in one season instead of lasting four
Deck stain has a strange reputation: half the internet says "re-stain every year, it's just what decks cost," the other half shows off semi-transparent finishes still rich in year four. Both are telling the truth — about different prep. A penetrating stain on clean, dry, open-pored wood bonds into the fibers and weathers gradually. The same product on damp, grey, or glaze-sealed boards sits on the surface as an accidental film and peels by the next spring.
Here's the uncomfortable math: on a typical 300 sq ft deck, the stain itself is $80-150 of the project. The difference between the one-season result and the four-year result is roughly $60 of prep products and one extra weekend day — cleaner, brightener, a moisture check, and the patience to wait for the right weather window. Skip those and you're not saving money; you're scheduling a re-do with extra stripping labor attached.
This guide pairs with our 11 Best Deck Stain Brands 2026 roundup — that page covers which stain to buy for your wood, climate and color goals, this page covers how to not waste it. Read them together before you open a can.
Mistake #1: Staining wet wood
What goes wrong: The finish looks fine for a few months, then peels in thin curling flakes the following spring — worst in shaded corners and around planters. Sometimes a milky haze or bubbling shows up within weeks. The moisture that was inside the boards on staining day eventually had to leave, and it took the finish with it.
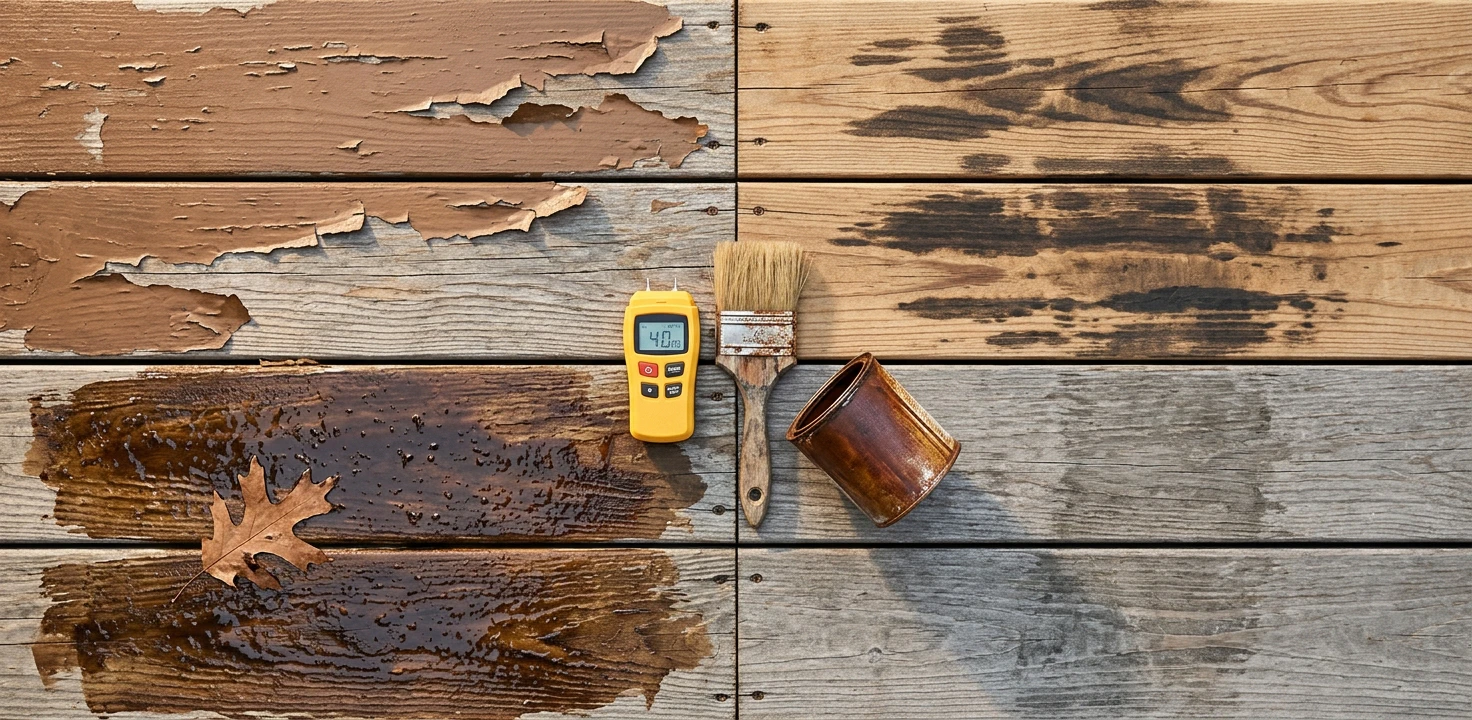
Why it happens: Wood looks surface-dry within hours of a pressure wash or rain, but the board interior stays saturated for days. Stain manufacturers spec a maximum wood moisture content — almost universally 15% — because above it, the stain can't displace water in the wood pores, so it sits on top instead of penetrating. The DIY schedule trap makes this the most common mistake on the list: people wash Saturday morning and stain Saturday afternoon because the weekend is the time they have.
The fix: separate washing and staining by at least one weekend, and verify instead of guessing.
- Wait 24-48 hours minimum after washing or rain — in warm dry weather, for sun-exposed boards. Shaded decks and cool spring weather need 3-4 days.
- Measure, don't eyeball. A pin-type wood moisture meter reads board moisture in seconds — check several spots including the shadiest corner, and stain only below 15%. Browse wood moisture meters on Amazon →
- No meter? Tape a 1×1 ft clear plastic square to a board overnight. Condensation under the plastic in the morning = wait another day and re-test.
Mistake #2: Skipping the cleaner-and-brightener step
What goes wrong: Blotchy, muddy color that looks nothing like the can swatch; stain that wears through in the traffic path within a season; dark patches where mildew kept growing under the new finish.
Why it happens: Weathered wood is coated in things stain can't bond to — grey oxidized fibers, mildew, dirt, and tannin stains. Pressure washing alone blasts off dirt but leaves the dead grey fiber layer, and a too-aggressive wash adds fuzzy torn grain on top. The two-step chemical prep exists because each step fixes what the other can't: deck cleaner (sodium percarbonate) lifts dirt, mildew and dead fibers; brightener (oxalic acid) neutralizes the cleaner's high pH, removes tannin and rust staining, and re-opens the wood pores so stain can actually penetrate. Skipping the brightener after cleaning leaves the surface alkaline — which visibly darkens and degrades oil-based stains.
The fix: the $40 two-step, always in order, always both.
- Step 1 — cleaner: apply with a pump sprayer to wet wood, keep wet 10-15 minutes, scrub traffic areas with a stiff brush, rinse thoroughly with a garden hose or LOW pressure wash (under 1,500 PSI, fan tip, 12+ inches off the boards). Browse deck cleaners on Amazon →
- Step 2 — brightener: apply to the rinsed deck, wait 10-15 minutes, rinse again. The wood visibly lightens back toward its fresh-cut color — that's the open surface you want. Browse wood brighteners on Amazon →
- Then the dry-down from Mistake #1 — 48 hours before stain touches the boards.
Mistake #3: Wrong product over the old finish
What goes wrong: A penetrating stain applied over an old solid or film-forming finish dries into a weak gummy skin and peels in sheets. Or a new coat over an already-flaking finish fails exactly where the old one did — because it's attached to the old one.
Why it happens: Penetrating stains work by soaking into wood pores. An old film — solid stain, failed water-based film, even heavy layers of old semi-transparent — physically blocks them from reaching wood, so the "penetrating" product becomes an unintentional (and badly formulated) film. Meanwhile any new product applied over a finish that's actively peeling inherits the old finish's bond: the stack is only as strong as the layer that was already letting go.
The fix: identify what's on the deck before choosing what goes on it.
- Water-drop test: sprinkle water across several boards. Soaks in within 1-2 minutes = wood is open, a maintenance coat of the same stain type works. Beads up or sits = something is still sealing the surface; penetrating stain will not take.
- Old finish intact + same type going on: clean (Mistake #2), dry, one thin refresh coat. The easy path — this is why staying within a product family pays.
- Old finish peeling anywhere, or switching types: strip first with a deck stain stripper, then brighten (stripping, like cleaning, leaves high-pH wood), then treat the deck as bare. Budget a full extra day. Browse deck stain strippers on Amazon →
- Old solid stain in good shape: the one case where the practical answer is "stay solid" — re-coat with solid. Getting all the way back to raw wood from solid stain is sanding-heavy work that rarely beats just maintaining the film.
Mistake #4: Staining in the wrong weather window
What goes wrong: Lap marks — darker stripes where a dried edge got overlapped; sticky patches that took days to dry; a finish that washed out in spots after a surprise overnight shower; white blush on a humid morning's work.
Why it happens: Stain needs time to penetrate before it dries. Direct midday sun on hot boards flash-dries the working edge in minutes — you're overlapping dried stain by the second board, and every overlap is a double-load stripe. The spec window for almost every brand is 50-90°F, out of direct hot sun, no rain for 24-48 hours, and a dry morning-dew margin — and the board surface temperature matters more than air temperature, because deck boards in full sun run 20-30°F hotter than the air.
The fix: plan the day around the sun, not the clock.
- Follow the shade. Start on the side of the deck the sun has left and work behind it. On a fully exposed deck, stain in the morning after dew burns off, or in the evening — never midday in summer.
- Check the 48-hour forecast, not just today's. Rain inside 24 hours washes out penetrating oils; inside 48 hours risks spotting water-based finishes.
- Keep a wet edge. Work 2-3 boards at a time, running their full length end to end, and never stop mid-board. Lap marks live where partial boards meet.
- Mind the dew point in spring and fall — finishing at 6pm with dew arriving at 9pm puts moisture on uncured stain. Earlier finish or a different day.
Mistake #5: Over-applying penetrating stain
What goes wrong: The deck stays tacky for days, collects pollen and footprints, and eventually the excess hardens into a glossy-ish skin that peels — on a product that "can't peel." Often triggered by the most natural instinct in DIY: "the can says two coats, and more protection is better."
Why it happens: Penetrating stains protect from inside the wood. The boards absorb a finite amount — everything past saturation has nowhere to go and no film-forming chemistry to cure properly on the surface. Dense or older wood takes even less. The "two coats" on some labels means two thin, wet-on-wet passes within minutes of each other — not a second full coat the next day over an already-saturated surface, which is where most tacky decks come from.
The fix: let the wood decide, and remove what it refuses.
- Apply thin. One working coat, brushed or padded into the wood, not flooded on. A stain pad on a pole handles the field fast and evenly; brush the gaps and ends. Browse deck stain applicator pads on Amazon →
- Back-wipe after 15-20 minutes: anything still sitting wet on the surface gets wiped off with a rag or dry pad. This single habit (it's the entire application method for Ready Seal-style goof-proof oils) prevents the tacky-deck failure completely.
- Second coat only if the wood drinks the first — thirsty old boards that absorb a thin coat in minutes can take a wet-on-wet second pass. A surface that stays shiny is a surface that's done.
- Already tacky? Fresh: wipe down firmly with mineral spirits (oil stains) — it re-activates and lifts the excess. Weeks-old gum: stripper, brightener, restart with thin coats.
Mistake #6: Staining new wood too soon (or not prepping it at all)
What goes wrong: Two opposite new-deck failures. Stain on fresh pressure-treated lumber beads, blotches and peels because the boards are still saturated with treatment solution. Stain on new cedar or smooth-planed boards barely changes their color and wears off in months — it never got past the polished surface.
Why it happens: "New wood is clean wood, stain weekend one" feels obviously right and is wrong in both directions. Standard PT lumber ships waterlogged — it can't absorb anything for weeks. And planing at the mill burnishes a glaze onto board faces (mill glaze) that sheds stain like wax paper; new cedar decking is the classic case.
The fix: test the wood, don't trust the calendar.
- New pressure-treated: sprinkle-test every couple of weeks; stain when water soaks in within a minute or two instead of beading. Typically 4-8 weeks in dry sunny weather, longer in humid climates. Don't push past a few months either — unprotected boards start greying and checking. KDAT lumber (kiln-dried after treatment) skips the wait entirely and is worth the upcharge if you're building new.
- New cedar / smooth-planed boards: scuff-sand with 60-80 grit (a pole sander makes it an hour, not a day) to cut the mill glaze, sweep, then a light cleaner-brightener pass. The color payoff is dramatic — glazed boards take maybe half the pigment of opened boards. Browse pole sanders on Amazon →
- Either way: the Mistake #1 moisture check still applies before stain day.
Mistake #7: Waiting for full failure before re-coating
What goes wrong: The deck looked "still fine" for two extra summers, then suddenly it's grey in the traffic paths, black around the planters, and the re-stain has turned into a strip-clean-brighten-sand restoration weekend — the expensive project this whole guide exists to prevent.
Why it happens: Stain wear is invisible until it isn't. UV degrades the finish gradually; the protection is mostly gone a season before the color visibly fails, and bare-wood weathering starts immediately after. The maintenance economics are lopsided and almost nobody internalizes them: a refresh coat on a still-protected deck is clean + dry + one thin coat — half a day and $40-80 of stain. A restoration after visible failure is strip + brighten + sand + two coats — two or three full days and several times the cost.
The fix: re-coat on the wood's schedule, not the crisis's.
- Watch the horizontal surfaces: deck boards and stair treads take all the UV and traffic — they need refresh every 2-3 years with semi-transparent oils (verticals like railings go 4-6). The spring water-drop test tells you: water soaking straight in = this year; still beading = next year.
- Refresh before failure: light cleaner pass, 48-hour dry, one thin maintenance coat of the same product. Staying within the same stain family is what keeps this path open — see Mistake #3 for what switching costs.
- Mark the calendar literally: write the stain brand, color and date inside a deck-box lid or on the under-stair framing. Future-you (or the next owner) will be doing the water-drop test with actual information.
Watch: rescuing a deck that already peeled
If you're reading this guide because the damage is already done, here's the full repair path in motion — stripping the failed finish, sanding back to sound wood, and re-sealing, on a real peeling deck with a proper before-and-after. It's the exact workflow from Mistakes #3 and #7 above, and watching it once makes the strip-or-refresh decision much easier to call on your own boards.
"How To Restore A Peeling Deck Step by Step | Stripping, Sanding And Sealing" by Viccon Coatings — embedded from YouTube
The prep-day product chain
The stain gets the glory; the prep chain decides the lifespan. The full kit for a typical 300 sq ft deck, all linked for one-click ordering:
- Deck cleaner + brightener two-pack ($30-45) — the Mistake #2 chemicals; kits sized for 500-1,000 sq ft. Browse cleaner + brightener kits on Amazon →
- Wood moisture meter ($25-35) — the gate between washing weekend and staining weekend.
- Pump sprayer ($15-25) — applies cleaner and brightener evenly without bathing the shrubs.
- Stain applicator pad on a pole + a 4-inch brush ($20-30) — pad for the field, brush for gaps, ends and railings.
- Stripper (only if Mistake #3 applies): deck stain stripper + an extra brightener pass, plus a day.
Haven't picked the stain itself? Our 11 Best Deck Stain Brands 2026 roundup → ranks Cabot, Penofin, Ready Seal, Defy and 7 more by chemistry, UV durability and price per gallon — including which products forgive beginner application and which punish it. Pair the brand pick with this mistakes guide and the deck gets its four good years.
 11 Best Deck Stain Brands 2026
 Outdoor Deck: Pressure-Treated vs Composite
 Outdoor Walls: Cedar vs Composite
 Full outdoor deck guide